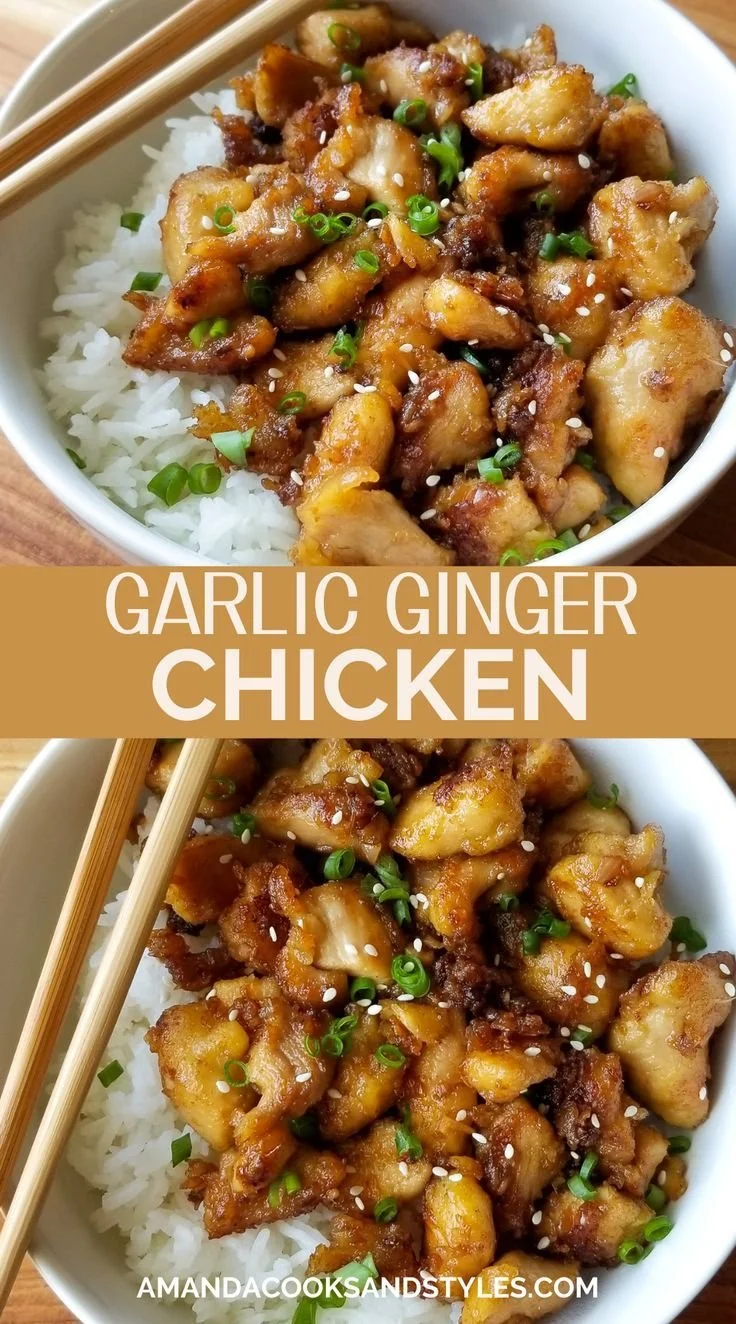
Garlic Ginger Chicken is a delightful dish that brings together the robust flavors of ginger and garlic with tender chunks of chicken. It’s not only easy to prepare but also incredibly satisfying, making it a perfect choice for a weeknight dinner or a cozy meal any day of the week. You’ll love how fast it comes together without sacrificing flavor, and it’s sure to please the entire family.
Why You’ll Love Garlic Ginger Chicken
- Quick and Easy: This recipe takes under 30 minutes to prepare, making it perfect for busy weeknights.
- Flavor-Packed: The combination of garlic, ginger, and soy sauce creates a mouthwatering sauce that envelops the chicken beautifully.
- Versatile: Serve it over rice or noodles, or alongside steamed vegetables for a well-rounded meal.
- Family-Friendly: With its mild yet savory profile, even picky eaters will enjoy this dish.
- Great for Meal Prep: This chicken dish holds up well in the fridge, making it a fantastic option for meal prepping.
Recipe Overview
- Prep Time: 15 minutes
- Cook Time: 15 minutes
- Total Time: 30 minutes
- Servings: 4
- Difficulty Level: Easy
Ingredients You’ll Need for Garlic Ginger Chicken
- Chicken:
- 1 lb. Chicken Thighs (boneless, skinless, cut into small chunks)
- For the Sauce:
- 1 Egg
- 3 tbsp Cornstarch
- 3/4 cup Water
- 1 tbsp Fresh Ginger (very finely chopped)
- 1 tbsp Fresh Garlic (very finely chopped)
- 1 tbsp Yellow/White Onion (very finely chopped)
- 3 tbsp Soy Sauce
- 3 tbsp Brown Sugar
- 1 tbsp White Wine Vinegar
- 1 tsp Sesame Oil
- Cooking Oil:
- 2 tbsp Avocado Oil
- Garnish:
- Green Onions (chopped)
- Sesame Seeds
This mix of ingredients ensures you have a flavorful and balanced dish. Feel free to substitute chicken thighs with chicken breast for a leaner option, or use tamari or coconut aminos if you need a gluten-free alternative.

here
How to Make Garlic Ginger Chicken
-
Prepare the Sauce: In a small bowl, mix together the white wine vinegar, sesame oil, ginger, garlic, onion, brown sugar, soy sauce, and water.
-
Simmer the Sauce: Heat a skillet over medium heat and pour in the sauce. Bring it to a light simmer and let it cook for about 10 minutes until the sauce darkens. Carefully pour the sauce back into the bowl and set aside.
-
Coat the Chicken: In a large mixing bowl, add the chicken and sprinkle the cornstarch over it. Toss until the chicken pieces are fully coated. If necessary, add an additional tablespoon or two of cornstarch for better coating.
-
Prepare the Egg Coating: In a small bowl, whisk the egg. Pour it over the coated chicken and gently mix to ensure all pieces are covered.
-
Cook the Chicken: In the same skillet used for the sauce, add the avocado oil and heat to medium-high. Once hot, carefully add the chicken in a single layer. Allow it to cook without moving for about 5-7 minutes until the bottom is golden brown.
-
Flip the Chicken: Once the bottom is golden, flip the chicken over, gently breaking the pieces apart. Cook for another 5-7 minutes until the other side is golden.
-
Finish Cooking: Lower the heat and let the chicken cook for another 10 minutes, stirring occasionally to ensure even cooking.
-
Add the Sauce: Drain excess oil from the pan if necessary and raise the heat back to high. Pour the reserved sauce over the chicken and stir frequently for a few minutes until it thickens and coats the chicken well.
-
Serve: Garnish the dish with chopped green onions and sesame seeds if desired. Enjoy your meal!
Tips for Success
- Allow the chicken to sit in the cornstarch for a few minutes before cooking for improved texture.
- Ensure your pan is hot enough before adding the chicken to achieve a nice golden crust.
- Stir the chicken occasionally only after the initial cooking time to prevent it from breaking apart too much.
- If the sauce is too thin after adding it back, let it simmer for a few more minutes to thicken.
Easy Variations
- Crispy Chicken: For a crunchier texture, coat the chicken in breadcrumbs after the egg dip before frying.
- Vegetable Add-In: Add diced bell peppers or snap peas during cooking for an additional nutritional boost.
- Spicy Kick: Incorporate a teaspoon of red pepper flakes or Sriracha into the sauce for a spicy version.
- Reduce Sugar: Cut back on the brown sugar if you prefer a less sweet flavor, or replace it with honey for a different taste.
What to Serve with Garlic Ginger Chicken
- Steamed Rice: A simple bed of white or brown rice soaks up the delicious sauce.
- Noodles: Serve alongside lo mein or rice noodles for a satisfying meal.
- Stir-Fried Vegetables: A mix of broccoli and carrots adds color and nutrition to your plate.
- Salad: A light Asian-style salad with sesame dressing complements the rich flavors of the chicken.
Storage and Reheating
- Refrigerator Storage: Store leftovers in an airtight container for up to 3 days.
- Freezer Storage: It can be frozen for up to 2 months. Thaw in the refrigerator before reheating.
- Best Reheating Method: Reheat on the stove over low heat to preserve the chicken’s texture. Adding a splash of water can help steam and revive the sauce.
- Meal Prep Tip: This dish is great for meal prep since the flavors deepen over a day or two, making leftovers even tastier.
Common Mistakes to Avoid
- Overcooking the Chicken: Keep an eye on the cooking time to avoid tough, dry chicken.
- Sauce Not Thickening: If the sauce doesn’t thicken, allow it to simmer longer without the lid, stirring frequently.
- Skipping the Cornstarch: Coating the chicken in cornstarch is crucial for a nice texture and helps the sauce adhere.
Garlic Ginger Chicken: Background & Cultural Inspiration
Garlic Ginger Chicken draws influence from various Asian cuisines where garlic and ginger are staples. In many Asian cultures, these ingredients are not only appreciated for their flavor but also for their aromatic qualities. This dish exemplifies a typical stir-fry method, showcasing how simple ingredients can come together to create a comforting yet vibrant meal. It’s often served in family meals, promoting a community atmosphere as diners share platters. The balance of flavors illustrates the principle of harmony in Asian cooking—sweet, savory, and umami, making it a beloved dish worldwide.
Frequently Asked Questions
Can I use chicken breast instead of thighs?
Yes, chicken breast can be used for a leaner option. Just be careful not to overcook it, as it can dry out more easily than thighs.
How can I make this dish gluten-free?
Replace soy sauce with tamari or coconut aminos, and ensure the cornstarch is gluten-free.
Can I prepare the sauce ahead of time?
Absolutely! You can make the sauce a day in advance and store it in the refrigerator until you’re ready to cook.
What can I substitute for brown sugar?
You can use honey, maple syrup, or coconut sugar based on your preference.
Is this dish suitable for freezing?
Yes, Garlic Ginger Chicken freezes well. Just be sure to store it in an airtight container, and thaw it fully before reheating.
Final Thoughts
Garlic Ginger Chicken is a delightful dish that’s vibrant, full of flavor, and incredibly easy to make. The balance of garlic and ginger creates a mouthwatering dish that’s sure to impress anyone at your table. Perfect for busy weeknights or meal prep, it offers both convenience and comfort. Try this recipe to infuse your weeknight dinners with a touch of culinary flavor that feels both exciting and homely.