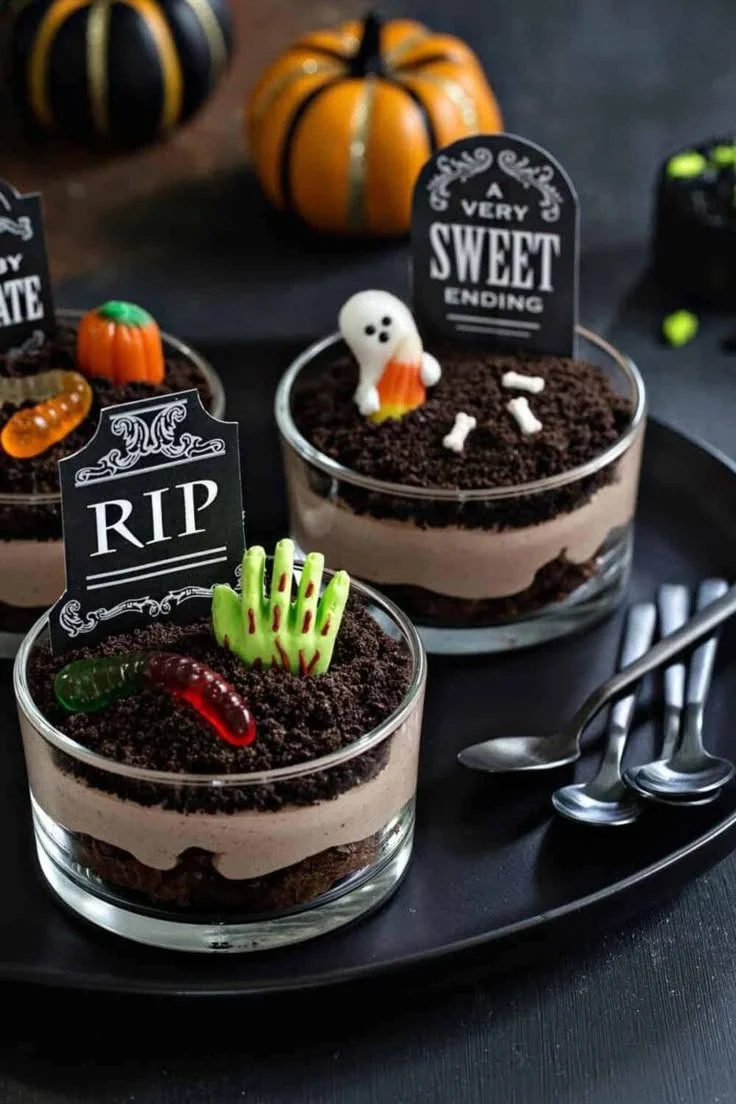
Spooky Halloween Brownie Dirt Pudding is a fun and delightful treat that will charm both kids and adults alike. This easy-to-make dessert combines rich brownies with creamy chocolate pudding and crushed Oreo cookies to create a spooky yet delicious dish. Perfect for Halloween gatherings, this recipe offers a unique and playful twist on traditional desserts, making it a must-try for festive occasions.
Why You’ll Love Spooky Halloween Brownie Dirt Pudding
- Fun Presentation: This dessert not only tastes great but looks fantastic, especially with the spooky decorations and layering. It’s perfect for getting kids excited about Halloween!
- No-Bake Option: While it includes brownies, much of the pudding part is no-bake, helping you save time in the kitchen.
- Customizable: You can easily adjust the flavors, colors, and toppings to fit your Halloween theme or personal taste preferences.
- Quick to Assemble: With a few prepared components, you can put this dessert together quickly, freeing you up for more Halloween fun.
- A Hit with Everyone: The combination of chocolatey flavors and crunchy textures appeals to various ages, making it a crowd-pleaser.
Recipe Overview
- Prep Time: 20 minutes
- Cook Time: 25 minutes (for brownies)
- Total Time: 45 minutes (plus chilling time)
- Servings: 8
- Difficulty Level: Easy
Ingredients You’ll Need for Spooky Halloween Brownie Dirt Pudding
-
For the Brownies:
- 1 box brownie mix (plus ingredients required on the box, typically eggs, oil, and water)
-
For the Chocolate Pudding Layer:
- 2 cups milk
- 1 (3.9 oz) package instant chocolate pudding mix
-
For Assembling:
- 15 Oreo cookies, crushed (for the dirt layer)
- 1 cup whipped cream or whipped topping (for topping)
-
To Decorate:
- Gummy worms (for a spooky look)
- Halloween-themed sprinkles (optional)

How to Make Spooky Halloween Brownie Dirt Pudding
-
Bake the Brownies:
- Preheat your oven according to the brownie mix instructions. Prepare a baking pan as directed on the box. Bake the brownies until they are set and a toothpick comes out with just a few crumbs (check the package for specific times).
-
Prepare the Pudding:
- In a mixing bowl, whisk the milk and instant pudding mix together for about 2 minutes, or until the mixture thickens. Set aside for about 5 minutes to ensure it has set properly.
-
Cool and Cut the Brownies:
- Once the brownies are done, let them cool completely in the pan. Once cooled, cut the brownies into squares.
-
Layer the Dessert:
- In individual cups or a large trifle bowl, layer your dessert by first adding a layer of brownie squares. Follow this with a layer of chocolate pudding (about half of your pudding mixture).
-
Add Dirt:
- Sprinkle half of the crushed Oreo cookies over the pudding layer. Repeat with another layer of brownie squares and the remaining pudding. Finish with the remaining crushed Oreos on top to create a dirt effect.
-
Top with Whipped Cream:
- Add a layer of whipped cream on top of the crushed cookies. You can create swirls or just a flat layer, depending on your preference.
-
Decorate:
- Place gummy worms on top and sprinkle with Halloween-themed decorations if desired.
-
Chill:
- Refrigerate the assembled dessert for at least 1 hour before serving to allow the flavors to meld and to chill thoroughly.
Tips for Success
- Let Brownies Cool Completely: To avoid sogginess, make sure the brownies are completely cool before cutting and layering.
- Use Cold Milk for Pudding: Make sure your milk is cold when preparing the pudding to ensure it thickens properly.
- Crush Oreos Finely: For a more realistic dirt look, crush the Oreos until they are a fine powder.
- Chill Before Serving: Allowing the pudding dessert to chill helps it set up and makes it easier to serve.
- Customize Decor: Feel free to get creative with your decorations. Add in spooky edible eyes, mini pumpkins, or other Halloween-themed treats for added fun.
Easy Variations
- Add Different Layers: Swap the chocolate pudding for vanilla pudding for a different flavor.
- Incorporate Other Cookies: Use crushed chocolate chip cookies or any other cookie you prefer in place of Oreos for a different texture and flavor.
- Switch Up Toppings: Instead of whipped cream, top it with chocolate shavings or a drizzle of chocolate sauce.
- Make it Gluten-Free: Use a gluten-free brownie mix to cater to those with dietary restrictions.
- Add Fruit Layers: Layer in sliced bananas or strawberries for a fruity twist amidst the chocolate layers.
What to Serve with Spooky Halloween Brownie Dirt Pudding
- Pumpkin Spice Cupcakes: Their warm spices and sweetness complement the rich chocolate flavor, making for a festive touch.
- Caramel Apple Slices: The crispness and tartness of the apples contrast nicely with the rich dessert.
- Mummy Hot Dogs: These fun, savory treats provide a savory balance to the sweetness of the pudding dessert.
- Ghost-shaped Marshmallows: A simple but fun side that ties into the Halloween theme.
- Monster Energy Drinks: Fizzy drinks add a fun touch and give adult guests a boost of energy.
Storage and Reheating
- Refrigerity Storage: Store leftovers in an airtight container in the refrigerator for up to 3 days. The layers may start to lose their distinct textures over time but will still taste great.
- Freezing: It is not recommended to freeze this dessert as it may alter the texture of the pudding and whipped cream.
- Eating Leftovers: Chill leftovers again if needed, and serve cold for the best experience.
Common Mistakes to Avoid
- Overbaking Brownies: Keep an eye on the brownies to avoid them becoming dry; check a few minutes before the suggested baking time.
- Using Warm Pudding: Let the pudding fully set before layering; warm pudding can melt your whipped cream and ruin the texture.
- Incorrect Layering: Ensure even layers; if you pour too much pudding on the brownies, they can become soggy.
- Skipping Chilling Time: Don’t skip the chilling step, as it helps the flavors meld and firm up the dessert.
- Using Too Thick Whipped Cream: If using homemade whipped cream, don’t over-whip it to avoid a butter-like consistency.
Spooky Halloween Brownie Dirt Pudding: Background & Cultural Inspiration
Brownie desserts have become beloved staples in American baking, often bringing comfort and indulgence. The idea of "dirt pudding," or "dirt cups," originated as a playful way to create desserts that evoke childhood memories, involving mixing pudding and crushed cookies to mimic soil. At Halloween, these concepts merge into a festive treat that encourages creativity, fun, and participation, making it perfect for gatherings and celebrations.
Frequently Asked Questions
Can I make this dessert in advance?
Yes! You can prepare it a day ahead and store it in the refrigerator. Just wait to add any decorations until shortly before serving.
Can I use reduced-fat cookies or pudding mix?
Yes, you can substitute with lower-fat versions of pudding mix and cookies, but the texture and flavor may be slightly different.
How can I make this dessert gluten-free?
Simply use a gluten-free brownie mix and gluten-free cookies to ensure it meets dietary restrictions.
Can I add spices to the brownie mix?
Absolutely! Feel free to add cinnamon or nutmeg for a warm flavor twist that enhances the chocolate.
What’s the best way to crush Oreos?
You can place them in a zip-top bag and use a rolling pin to crush them, or pulse them in a food processor for a finer texture.
Final Thoughts
Spooky Halloween Brownie Dirt Pudding is a delightful dessert that combines fun and creativity in every layer. Its easy preparation and customizable nature make it a go-to for Halloween celebrations. Gather your ingredients, invite some friends over, and enjoy this playful treat that promises to be a highlight of your spooky season festivities. Give it a try—you won’t be disappointed!